
When it comes to overclocking your processor, it’s essential to your processor’s life and your sanity but also to your wallet that you stress test your overclocks and make sure they are stable.
How do you effectively stress test your CPU and deem it fit for long-term use, ensuring your CPU does not burn out before its time? I’m going to walk you through step by step to making sure your voltages are stable and your overclock is as solid as a rock.
Why should we stress test our processor?
When you overclock your processor you place an additional load on all of your pc components this includes your CPU. Every CPU has its own unique threshold, that is the point where it will not go any further no matter how cold you make it or how much voltage you pump through it but testing where that wall is can be hard, especially for newbies coming into overclocking.
Effectively Stress Testing Your CPU
I always start the first round with a run of 3DMark, While many may say that running prime95 first is a far better stress test for your CPU that running 3DMark, I disagree and here’s why.
Prime95 Should be run for a minimum of 12 hours, Where 3DMark takes only 15 minutes and still places a considerable load on the PC’s ram, CPU and power supply. If the initial test fails then you know that you have either:
- Hit your processors ‘brick wall’
- Pushed the CPU too far without providing adequate voltage
- Pushing your ram to far without loosening the timings or upping the voltages
- Your CPU cooling solution is not up to the task, your chip is too hot!
If your machine does however pass the 3DMark test, head over the Prime95 website and grab yourself a copy of Prime95. Once you have downloaded it drag it to your desktop and open the application.
It would be wise to have a desktop application such as HWmonitor by CPUID to monitor your power supply voltages while you are stress testing to make sure that if the test does fail, you are sure it’s not a flaky power supply rails.
Thanks to Denim-187 over at overclock.net here are the best settings to make sure you are using the maximum amount of ram while torture testing your CPU. It’s important to do this because your ram and CPU frequency is linked via the FSB or AMD’s Hyper Transport Technology, if you increase the frequency of your CPU then the speed of your ram will increase.
* This rule does not apply to CPU multiplier increases and as such is why unlocked processors such as AMD’s FX Series and Intel’s K-series CPUs are highly sought after by overclockers.
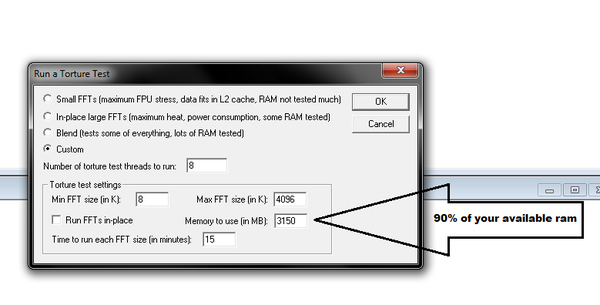
Optimal Prime95 Settings
- Custom Blend
- Ctrl + Alt + Delete to check the available ram in start task manager under Performance
- Then input 90% of the available ram (e.g if you have 3500mb of ram available, 90 % of that which is 3150)
It’s advised to run Prime95 for 12 – 24 hours to make sure your system is 100% stable although normally unstable overclocks will show up pretty fast, normally within around the 30-minute mark.
There we have it, effectively stress testing your CPU and ram to make sure they can survive the test of time without crashing during that vital game of counter strike!


