When it comes to overclocking your processor, it’s essential to your CPU’s life expectancy that you stress test your CPU overclocks and make sure they are stable because failure to maintain system stability could result in dead pc components.
The big question that led you to this article though; How do I stress test my CPU?
I’m Andy, I’ll be your host for the next few minutes and I’m going to walk you through the CPU stress testing process step by step. If you like, you can follow me on Twitter.
Table of Contents
Why Should I Stress Test My CPU?
When you overclock your CPU you place an additional load on all of your pc components this includes your motherboard, ram, graphics card and power supply. A system is not stable just because you can boot into Windows and browse Facebook. You need to verify the stability of your computer by putting it through a series of tests designed to push your system to its limits.
These stress tests or as they are otherwise known in the overclocking community, stability tests, will ensure your computer doesn’t randomly crash while under intensive processing load resulting in your potentially losing that clutch game or pivotal document you spent all night writing.
How to Stress Test Your CPU Overclock
I’m an old-school overclocker having started around the age of 14 – 20 years ago. As a result, I am stuck in my ways and still approach CPU stability testing in the same way I did when I first learned all that time ago. As a result, my methods might seem a little dated but I assure you; these overclocking stress testing methods will get the job done.
Pretest: 3DMark
I always start with a run of 3DMark Benchmark. This helps me to ensure the system is warmed up and gives me a general glance at the stability of a system before I commit to a 12 hour Prime95 torture test which is still the ultimate test of an overclocks stability.
If this initial warm-up stress test fails, you just saved yourself a huge amount of time by running a shorter benchmark first. Here are some of the things it could be;
If 3DMark Fails
- You hit your CPU’s overclocking ‘brick wall’.
- You pushed your CPU too far without providing enough vcore / vid.
- You didn’t set an XMP profile for your RAM.
- The cooling being provided for your CPU is underperforming.
- You reached your CPU’s thermal limits.
You might be tempted to run Prime95 first but, 3DMark takes only 15 minutes to complete and places a huge load on most of the system components including the RAM, CPU, Powersupply, GPU and Motherboard allowing you to quickly determine if your system could potentially last 24 hours under a torture test.
Testing: Prime95 /w Optimal Settings
If your computer passed the initial 3DMark test, well done! Now it is time to really turn up the heat and torture your overclocked components into submission by throwing huge sets of data of them to crunch.
What you will need
- Prime95 Head over the Prime95 website and grab yourself a copy of Prime95. Once you have downloaded it drag it to your desktop and open the application.
- HWMonitor Personally, I have always used HWmonitor to check my system vitals when stress testing but, you’re welcome to use any hardware monitoring software you like.
Optimal Prime95 Settings

- You will need to download Prime95 if you don’t already have it.
- Start a New Torture Test
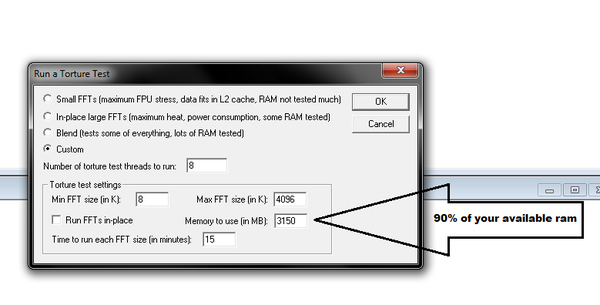
- Select Custom Blend
- Set the number of threads to the number of cores you have (double that for virtual cores)
- Press Ctrl + Alt + Delete to check the available ram in start task manager under the Performance tab
- Calculate 90% of your total system memory using the following calculation:
amount_of_memory_in_mb * .9 - In the box that reads “Memory to use in MB” insert the sum of step 3
- Click Start
I personally advise to run Prime95 for 12 – 24 hours to make sure your system is 100% stable. Normally thought, unstable overclocks will show up pretty fast, normally within around the 30-60 minute mark.


